自己投資としてチャレンジしている内容を Blog で公開しています。今回は Open-Source の Terraform を Ubuntu の VS Code 上で実装し、Azure のクラウド上で Resource Group を作成したいと思います。
▼1. VS Code を利用して Terraform のコードを書いてみる
Visual Studio Code は Java, C, C++, C# など色々な言語を、Windows, Linux, Mac 上で実行できる開発環境を提供しています。今回は以下のドキュメントを参考に Terraform を試してみます。 (参考) Terraform by HashiCorp
Terraform は Open-Source で、クラウドやオンプレミスのリソースの作成や管理に利用できます。対象となるサービスは、Amazon Web Services (AWS), Azure, Google Cloud Platform (GCP), Kubernetes, Helm, GitHub, Splunk, DataDog など多岐に渡り、環境構築に利用されている場面をよく見かけます。 (参考) What is Terraform | Terraform | HashiCorp Developer
▼2. 事前準備
2-1. Ubuntu 20.04.2 LTS の利用
https://releases.ubuntu.com/20.04/
2-2. Visual Studio Code のインストール
https://code.visualstudio.com/docs/setup/linux
sudo snap install --classic code2-3. Azure 無料アカウントの用意など
下記ドキュメントを参考に Azure 無料アカウント作成し、Terraform を構成します。
Azure の無料アカウントを今すぐ作成 | Microsoft Azure
Bash を使用して Azure Cloud Shell で Terraform を構成する | Microsoft Learn
2-4. Node.js をインストール
https://www.kumoman.net/site/2022/06/05/nodejs-vscode-no52-2022-06/
2-5. Azure Terraform Visual Studio Code 拡張機能のインストール

2-6. Azure CLI のインストール
以下のドキュメントを参考に Azure CLI をインストールします。
Azure CLI を Linux にインストールする | Microsoft Learn
Visual Studio Code を起動し Terminal メニューの New Terminalをクリックし、az login のコマンドを実行し利用している Azure のアカウントにログインします。
▼3. 事前準備
3-1. terraform のサンプルコードを作成します。
まずは Terraform のコードを置くディレクトリを作成し、作成したディレクトリに移動後コードを作成します。
>mkdir terraformtest
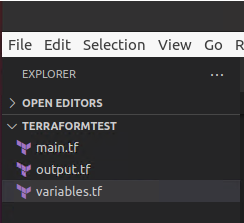
>cd terraformtest次に、作成したディレクトリの配下に以下 3 つの tf ファイルを作成します。
- main.tf
- variables.tf
- outputs.tf
tf ファイル作成後、VS Code 上では以下のように表示されます。
では実際に tf ファイルを作成します。以下は main.tf の例です。version は現在の terraform との version が異なるとエラーが表示されるので、エラーメッセージに従い変更します。
>code main.tf# main.tf
terraform {
required_providers {
azurerm = {
source = "hashicorp/azurerm"
version = "= 3.29.1"
}
}
}
provider "azurerm" {
features {}
}
resource "random_pet" "rg_name" {
prefix = var.resource_group_name_prefix
}
resource "azurerm_resource_group" "rg" {
location = var.resource_group_location
name = random_pet.rg_name.id
}variables.tf の例です。
>code variables.tf# variables.tf
variable "resource_group_location" {
default = "eastus"
description = "Location of the resource group."
}
variable "resource_group_name_prefix" {
default = "rg-test"
description = "Prefix of the resource group name that's combined with a random ID so name is unique in your Azure subscription."
}outputs.tf の例です。
>code variables.tf# output.tf
output "resource_group_name" {
value = azurerm_resource_group.rg.name
}3-2. Azure Terraform のコマンドを順次実行し、Azure リソースマネージャを作成します。
Ctrl+Shift+P を押し (View -> Command Palette) を選択後、以下を順次実行していきます。
- Azure Terraform: Push
- Azure Terraform: Init
- Azure Terraform: Plan
- Azure Terraform: Apply
1 の Azure Terraform: Push 実行後、Terminal には以下が表示されます。
Select directory...
Requesting a Cloud Shell...
Connecting terminal…
2 の Azure Terraform : init を実行した場合、以下が Terminal に表示されます。
$ terraform init

Initializing the backend...

Initializing provider plugins...
- Reusing previous version of hashicorp/azurerm from the dependency lock file
- Reusing previous version of hashicorp/random from the dependency lock file
- Using previously-installed hashicorp/azurerm v3.29.1
- Using previously-installed hashicorp/random v3.4.3

Terraform has been successfully initialized!

You may now begin working with Terraform. Try running "terraform plan" to see
any changes that are required for your infrastructure. All Terraform commands
should now work.

If you ever set or change modules or backend configuration for Terraform,
rerun this command to reinitialize your working directory. If you forget, other
commands will detect it and remind you to do so if necessary.
3 の Azure Terraform : Plan を実行した場合、以下が Terminal に表示されます。
$ terraform plan

Terraform used the selected providers to generate the following
execution plan. Resource actions are indicated with the following
symbols:
  + create

Terraform will perform the following actions:

  # azurerm_resource_group.rg will be created
  + resource "azurerm_resource_group" "rg" {
      + id       = (known after apply)
      + location = "eastus"
      + name     = (known after apply)
    }

  # random_pet.rg_name will be created
  + resource "random_pet" "rg_name" {
      + id        = (known after apply)
      + length    = 2
      + prefix    = "rg-test-"
      + separator = "-"
    }

Plan: 2 to add, 0 to change, 0 to destroy.

Changes to Outputs:
  + resource_group_name = (known after apply)

────────────────────────────────────────────────────────────────────

Note: You didn't use the -out option to save this plan, so Terraform
can't guarantee to take exactly these actions if you run "terraform
apply" now.
4 の Azure Terraform : apply を実行した場合、以下のような出力が Terminal に表示されます。
$ terraform apply

Terraform used the selected providers to generate the following
execution plan. Resource actions are indicated with the following
symbols:
  + create

Terraform will perform the following actions:

  # azurerm_resource_group.rg will be created
  + resource "azurerm_resource_group" "rg" {
      + id       = (known after apply)
      + location = "eastus"
      + name     = (known after apply)
    }

  # random_pet.rg_name will be created
  + resource "random_pet" "rg_name" {
      + id        = (known after apply)
      + length    = 2
      + prefix    = "rg-test-"
      + separator = "-"
    }

Plan: 2 to add, 0 to change, 0 to destroy.

Changes to Outputs:
  + resource_group_name = (known after apply)

Do you want to perform these actions?
  Terraform will perform the actions described above.
  Only 'yes' will be accepted to approve.

  Enter a value: yes

random_pet.rg_name: Creating...
random_pet.rg_name: Creation complete after 0s [id=rg-testxxxx]
azurerm_resource_group.rg: Creating...
azurerm_resource_group.rg: Creation complete after 3s [id=/subscriptions/xxxxx]

Apply complete! Resources: 2 added, 0 changed, 0 destroyed.

Outputs:

resource_group_name = "rg-test-xxxx"3-3. Azure の Portal サイトで、上記で作成されたリソースグループが表示されていることを確認し、削除します。
▼4. 参考情報
- What is Terraform | Terraform | HashiCorp Developer
- Azure CLI を Linux にインストールする | Microsoft Learn
- Azure Terraform Visual Studio Code 拡張機能のインストール | Microsoft Learn
- Terraform テンプレートを使用して App Service アプリを作成する – Azure App Service | Microsoft Learn
以上です。参考になりましたら幸いです。