自己投資としてチャレンジしている内容を Blog で公開しています。今回はクラウドの Storage の一つ Azure Blob Storage にアクセスしファイルをダウンロード、及び作成したファイルをアップロードする方法ついて紹介します。
————————————
▼1. Azure Blob Storage へアクセスおよびファイルの操作
————————————
Visual Studio Code を利用し、クラウドのストレージの一つである Azure Blob Storage にアクセスし、Storage 上にあるファイルを列挙(リスト) 後、ダウンロードし、その後作成したファイルをアップロードする Python コードを書きます。OS は Ubuntu 20.04.2 LTS を利用しています。
————————————
▼2. 事前準備
————————————
2-1. pip および Azure Blob Storage client library をインストールします。
sudo apt update
sudo apt updatesudo apt install python3-pip
pip3 install azure-storage-blob
pip3 --version
(結果)
pip 20.0.2 from /usr/lib/python3/dist-packages/pip (python 3.8)
2-2. Azure 無料アカウントを作成し、Azure Blob Storage アカウントを作成します。
2-3. Azure Storage Explorer から作成した Azure 無料アカウントにアクセスし、作成した Azure Blob Storage にある [Blob Containers] を右クリック、[Blob コンテナーの作成] をクリックし “files” のコンテナーを作成しファイルを置きます(今回 サンプルとして、abc.txt や README.txt のファイルを置きました)。
(参考情報) Azure Storage Explorer – クラウド ストレージ管理 | Microsoft Azure
2-4. Azure Blob Storage の Connection String を portal からコピーし、環境変数に設定します。
export AZURE_STORAGE_CONNECTION_STRING="<yourconnectionstring>"(参考情報) クイックスタート: Azure Blob Storage ライブラリ v12 – Python | Microsoft Docs
————————————
▼3. Azure Blob Storage へアクセスしファイルをリスト後ファイルをダウンロードし、作成したファイルを Blob へアップロードします。
————————————
3-1. blob storage へ、ダウンロード用のファイルを置きます。
今回の例では abc.txt および READEME.txt ファイルが置いてあることを確認します (上記 2-3 の項目)。
3-2. blobstgop.py を作成
(例) blobstgop.py
import os, uuid
from azure.storage.blob import BlobServiceClient, BlobClient, ContainerClient, __version__
try:
    print("Azure Blob Storage v" + __version__ + " - Python quickstart sample")
    # requirements
    connect_str = os.getenv('AZURE_STORAGE_CONNECTION_STRING')
    container_name = "files"
    blob_name = "Yourblobaccountname"
    downloadFileName = "abc.txt"
    localPath = "/home/user/PythonCode/blob-quickstart-v12"
    local_path = local_path + "/data"

    #Create the BlobServiceClient
    blob_service_client = BlobServiceClient.from_connection_string(connect_str)
    # Create the ContainerClient
    container_client = ContainerClient.from_connection_string(connect_str,container_name=container_name)

    # List the blobs in the container and Download the blobs into local.
    print('\nListing blobs and Downloading files...')
    # List the blobs in the container
    blob_list = container_client.list_blobs()
    for blob in blob_list:
        print("\t" + blob.name)

        # Download the blob to a local file
        download_file_path = os.path.join(localPath,blob.name)
        # Create a blob client using the local file name as the name for the blob
        blob_client = blob_service_client.get_blob_client(container=container_name,blob=blob.name)
        with open(download_file_path,"wb") as download_file:
            download_file.write(blob_client.download_blob().readall())

    # Upload the created file to the container
    # Create a file in the local data directory to upload and download
    local_file_name = str(uuid.uuid4()) + ".txt"
    upload_file_path = os.path.join(local_path, local_file_name)

    # Write text to the file
    file = open(upload_file_path, 'w')
    file.write("Hello, World!")
    file.close()

    # Create a blob client using the local file name as the name for the blob
    blob_client2 = blob_service_client.get_blob_client(container=container_name, blob=local_file_name)
    print("\nUploading to Azure Storage as blob:\n\t" + local_file_name)
    # Upload the created file
    with open(upload_file_path, "rb") as data:
        blob_client2.upload_blob(data)

except Exception as ex:
    print('Exception:')
    print(ex)
3-3. 実行結果は以下となります。
$ python3 /home/user/PythonCode/hello/blobstgop.py
Azure Blob Storage v12.8.1 - Python quickstart sample

Listing blobs and Downloading files...
        README.md
        abc.txt

Uploading to Azure Storage as blob:
a4fb472f-1647-44b9-85df-7982e769b5a7.txt3-4. Azure Storage Explorer から Blob Storage へアクセスし該当の Container ”files” の配下のファイルを確認します。
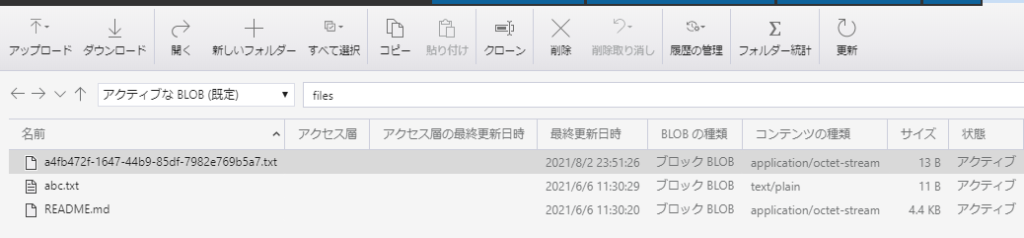
3-5. a4fb472f-1647-44b9-85df-7982e769b5a7.txt を vi コマンドで開くと Hello, World! と記載されていることが分かります。
————————————
▼4. 参考情報
————————————
(1) Azure 無料アカウント FAQ | Microsoft Azure
(2) Quickstart: Azure Blob Storage library v12 – Python | Microsoft Docs
以上です。参考になりましたら幸いです。