自己投資としてチャレンジしている内容を Blog で公開しています。
この blog では IntelliJ IDEA を利用して Java のコードを書いています。今回コードの実装に必要な library を自動でダウンロードしてくれる便利な設定について紹介します。(In English Enable auto-import on IntelliJ IDEA No.13)
————————————
▼1. 必要な library を自動でダウンロードする設定
————————————
1-1. Maven auto-import を IntelliJ IDEA で有効にします。
IntelliJ のメニューにある View -> Tool Windows -> Maven を選択すると以下のように Maven が右上に表示されます。
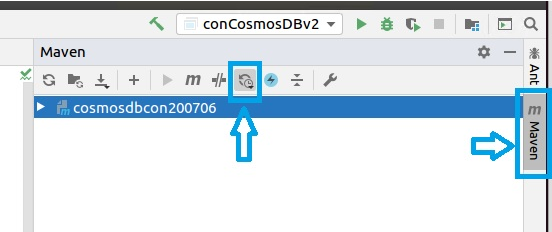
さらに下のように Toggle Auto Reload Mode をクリックし、Enable auto-reload after any changes を選択します。

1-2. Pom.xml に以下のように必要なライブラリーを指定します。その後、上記 1-1 設定により、ライブラリーが自動でダウンロードされます。File -> Project Structure -> Project Settings -> Libraries で自動でダウンロードされたライブラリーが確認できます。
(例) Pom.xml
 <dependencies>
        <dependency>
            <groupId>org.slf4j</groupId>
            <artifactId>slf4j-simple</artifactId>
            <version>1.7.30</version>
        </dependency>
        <!-- https://mvnrepository.com/artifact/com.azure/azure-cosmos -->
        <dependency>
            <groupId>com.azure</groupId>
            <artifactId>azure-cosmos</artifactId>
            <version>4.1.0</version>
        </dependency>
        <dependency>
            <groupId>io.netty</groupId>
            <artifactId>netty-tcnative</artifactId>
            <version>2.0.31.Final</version>
            <classifier>linux-x86_64</classifier>
        </dependency>
    </dependencies>
** ubuntu にインストールしている IntelliJ IDEA は以下です。
IntelliJ IDEA 2020.1.2 (Community Edition)
Build#IC-2017.7846.76, built on June 1, 2020
Runtime version: 11.0.7+10-b765.53 amd64
VM: OpenJDK 64-Bit: Server VM by JetBrains s.r.o
Powered by open-source software
————————————
▼2. 参考情報
————————————
How do I disable or enable Gradle / Maven auto-import for an IntelliJ IDEA project? https://stackoverflow.com/questions/43192504/how-do-i-disable-or-enable-gradle-maven-auto-import-for-an-intellij-idea-proje
以上です。参考になりましたら幸いです。